Difference between revisions of "Tutorial2.1"
(→Gestion des vols) |
(→Account Menu) |
||
| (120 intermediate revisions by 4 users not shown) | |||
| Line 1: | Line 1: | ||
| − | ==OpenFlyers 2. | + | ==OpenFlyers 2.1 Configuration== |
| − | The | + | The 2.1 release introduces flight management, pilot account management, as well as all accountancy management features. Making these functions to a working state requires some parameter settings. |
| − | Configuration operation | + | Configuration operation sequencing is of most importance! Neglecting that may create some bugs and problems. |
| − | == | + | == Introduction == |
| − | === First | + | === First Initialisation === |
| − | * | + | *Log in with the ID/password admin/admin or with an admin profile if you have already done an ID admin modification. |
| − | *Go to Admin/Users/"Users list" | + | *Go to Admin/Users/"Users list" to create your own member file. |
*Choose your date display format | *Choose your date display format | ||
| − | *Choose the timezone and your language | + | *Choose the timezone and your language |
| − | *Fill your file | + | *Fill in your file |
| − | *Do not forget to check the "club admin" profile, only profile | + | *Do not forget to check the "club admin" profile, the only available profile at this stage |
| − | * | + | *Log out, and then log in with your newly created ID. |
*Go back to Admin/Users/"Users list" and delete the admin member file. | *Go back to Admin/Users/"Users list" and delete the admin member file. | ||
== Parameter Menu == | == Parameter Menu == | ||
| − | + | Access the page through Admin/Configuration/Parameter Setting. This is where the various functions will be activated/inactivated. | |
Do not forget to push the "Submit" button on every section before setting a new section. | Do not forget to push the "Submit" button on every section before setting a new section. | ||
| − | === Reservation | + | === Reservation Management === |
| − | *Checking "Standard booking: by aircraft": each aircraft is identified by his own | + | *Checking "Standard booking: by aircraft": each aircraft is identified by his own registration. |
| − | * | + | *Booking by aircraft type allows to manage reservation by aircraft pool according to their type (Cessna 152, Robin DR42,...): thus reservation is not made with the registration chosen by the user but with the first available aircraft (according to a sequence/queue defined by the admin) of the same type as the one selected by the user |
| − | *Limitation in the time of the reservations: | + | *Limitation in the time of the reservations: there is the limitation in the number of weeks of advance reservation |
| − | *Number of reservations limitation: to limit the reservation | + | *Number of reservations limitation: to limit the number of the reservation each pilot can make |
| − | *Fill destination airfield: | + | *Fill in destination airfield: mandatory to fill in the destion field according to the duration |
| − | *You may choose to display | + | *You may choose to display the following booking field or not: "Same day" and "Booking comments" |
<center>[[Image:Club_Param_Resa_en.jpg|Gestion des réservations]]</center> | <center>[[Image:Club_Param_Resa_en.jpg|Gestion des réservations]]</center> | ||
| − | === Licence | + | === Licence Management === |
| − | * | + | *Disble it for the moment, as you will be able to activate it later! |
<center>[[Image:Club_Param_Qualif_en.jpg|Gestion des réservations]]</center> | <center>[[Image:Club_Param_Qualif_en.jpg|Gestion des réservations]]</center> | ||
| − | === | + | === Membership Management === |
| − | * Select "Alert | + | * Select "Access Alert", this option will warn the users when log in if the membership is not updated. By the end of the parameter setting you can change to "Restrictited access" with definitive profile |
| − | * Set | + | * Set the membership expiration date. |
<center>[[Image:Club_Param_Cotis_en.jpg|Gestion des réservations]]</center> | <center>[[Image:Club_Param_Cotis_en.jpg|Gestion des réservations]]</center> | ||
| − | === | + | === Flight Management === |
| − | *Activate " | + | *Activate "Closing flight only" |
*Select time units (the most common hour, minute). . | *Select time units (the most common hour, minute). . | ||
*No required flight | *No required flight | ||
| − | *No tolerance mode (mistakes should be corrected by the | + | *No tolerance mode (mistakes should be corrected by the pilot); Tolerance mode means that the software tries to correct the error(s) automaticly |
*Key panel inactive | *Key panel inactive | ||
*Overhaul management activated | *Overhaul management activated | ||
| − | * | + | *Enable all checkbox, later you can disable some of them |
<center>[[Image:Club_Param_Vols_en.jpg|Gestion des réservations]]</center> | <center>[[Image:Club_Param_Vols_en.jpg|Gestion des réservations]]</center> | ||
| − | === | + | === Account Management === |
| − | * | + | *Active account management |
| − | * | + | *No account type is created at this stage, so no default account can be selected |
| − | * | + | *Indicate your account currency and the currency symbol |
| − | * | + | *Display format is a pattern that allows you to manage your display (decimal separator, position symbol, ...) : $ for US Dollars, and € for Euro |
| − | + | *No Management if the balance is below a minimum amount. You can set the minimum amount when creating the profile | |
| − | * | + | |
<center>[[Image:Club_Param_Compte_en.jpg|Gestion des réservations]]</center> | <center>[[Image:Club_Param_Compte_en.jpg|Gestion des réservations]]</center> | ||
| − | == | + | == Club/Configuration Menu == |
| − | * | + | * Set the default langauge of the club; each pilot can configure his own display language |
| − | * | + | * Fill in others club fields |
| − | * | + | * Load your logo, the size around 300 x 200 pixels |
| − | * | + | * Select your airfield; if your airfriend is not available in the database, select Other and put coordinate format NDDMMSS and WDDDMMSS |
| − | * | + | * There is 2 messages box: the first on top of booking page, and the second on login page. |
| − | * | + | * Mail list, select generic; this function will be set later |
| − | * | + | * Set start and finish display time on booking page. Be carefull, it is UTC time, you should take into account your DST (Daylight Saving Time)if applicable |
| − | - | + | - example : France, Timezone UTC +1 h, DST summer + 1 h - |
| − | + | Display booking : Start from 7 o'clock, End at 22 o'clock : set 5 h and 20 h in summer time or 6 h and 21 h in winter time | |
| + | - example : Nouméa, New Caledonia, timezone UTC +11 h, no DST - | ||
| + | Display booking : Start from 7 o'clock, End at 22 o'clock : set 20 h (start ) and 11 h (end) | ||
| + | - example : Papeete, Tahiti, timezone UTC -10 h, no DST - | ||
| + | Display booking : Start 7 o'clock, End 22 o'clock : set 17 h (start ) and 8 h (end) | ||
| − | + | * Set minimal booking time and flight default time | |
| − | + | * Administrator name is shown on login page with an email link | |
| + | * Check default options for your new users | ||
| + | * Set the default format date | ||
| + | * Set timezone. Do not think of DST because it will be calculated automatically by the server | ||
| − | - | + | == Admin/Users Menu == |
| − | + | * In Users/Users go to the page where your log-in appears and tick off the membership checkbox, then click on "update" | |
| − | + | This should update the expiry date of membership set before | |
| − | + | ||
| − | + | ||
| − | + | ||
| − | + | ||
| − | + | *Go to Users/Status to create the status you wish for your club. I recommend: Student, Captain, Instructor as the minimum. | |
| − | * | + | |
| − | + | ||
| − | + | ||
| − | + | ||
<center>[[Image:Status_pilote_en.jpg|Statuts]]</center> | <center>[[Image:Status_pilote_en.jpg|Statuts]]</center> | ||
| − | == | + | == Admin/Fleet Menu == |
| − | + | ||
| − | + | ||
| − | * | + | Alert message will appear because of incomplet configuration. Ignore the messages; they will disappear as your follow the tutorial |
| − | : | + | * Flights/Flight types add flight type necessary for your club. |
| + | :I suggest: local flight, cross-country, flight instruction, maiden flight, maintenance check flight | ||
<center>[[Image:Flight_Type_en.jpg|Types de vol]]</center> | <center>[[Image:Flight_Type_en.jpg|Types de vol]]</center> | ||
| − | : | + | :Set Incompatible flight types |
| − | :: | + | :: Cross-country flight/Local flight |
| − | :: | + | :: Maiden flight/Local fight + Cross-country flight + Flight instruction |
| − | :: | + | :: Maintenance check flight/Local flight + Cross-country flight + Flight instruction + Maiden flight |
| − | + | To allow calculation of statistics, do not allow pilots to check multiple boxes when inputting flights; calculation of statistics will not be possible at the end of the year. We must create as many types of flight as necessary and put the maximum incompatibility. Only the type of flight in the case of a second pilot on board can be compatible with other types | |
<center>[[Image:Flight_Type_Uncomp_en.jpg|Types de vol incompatible]]</center> | <center>[[Image:Flight_Type_Uncomp_en.jpg|Types de vol incompatible]]</center> | ||
| − | : | + | : Do not fill in the Required qualifications table |
| − | + | Click on "Parameters" to define the required flight type in the case of a second pilot on board. This displays on page Club parameters, in Flight management check "Flight instruction" in "Required flight type when there is a second pilot on board". This action checks automatically "Flight instruction" when flying instructor will be selected as the second pilot. | |
| − | == | + | == Admin/Feet/Aircraft types Menu == |
| − | + | Now it is time to create the your fleet aircraft type: | |
| − | * | + | *In Fleet/Aircraft Types/ add your aircraft types |
| − | <center>[[Image:Aircraft_Type_en.jpg|Type | + | <center>[[Image:Aircraft_Type_en.jpg|Aircraft Type]]</center> |
| − | * | + | *After validation, click on Edit (pencil icon) |
| − | : | + | : Choose the time unit for the time meter of your aircraft |
| − | : | + | : Tolerance is tolerated meter gap between 2 flights. This will avoid alerts for forgotten flights. You can leave at 0 |
| − | : | + | : Indicate the endurance for the aircraft |
| − | : | + | : Choose your method fo computation management flight time. " Difference between start and stop" - You can change it later if it is not applicable in your case. For more information about possible formula please refer to [[AdminDoc2.0#Flight_hours_computation|Formula for calculating Flight Times]] |
| − | : | + | : Validate |
| − | : | + | : Indicate your aircraft tanks: the name of the tank, fuel type, and unit. Click add between each tank. |
| − | * | + | * Return to the previous page |
| − | * | + | * Do not create incompatibility |
| − | * | + | * Do not create required flight types |
| − | * | + | * In Allowed functions for this aircraft type, you must define the position in the aircraft : put "Captain" and "Student" as #1 and "Instructor" as #2 |
| − | <center>[[Image:Aircraft_Status_en.jpg| | + | <center>[[Image:Aircraft_Status_en.jpg|Allowed Fonctions by aircraft type]]</center> |
| − | == | + | == Admin/Fleet/Aircraft Menu == |
| − | |||
| − | |||
| − | |||
| − | + | Once the type of the aircraft is created, you are going to create your aircraft fleet: | |
| − | <center>[[Image: | + | * Go to Fleet/Aircraft and add an aircraft |
| + | <center>[[Image:Aircraft_List_en.jpg|add an aircraft]]</center> | ||
| − | == | + | * For each aircraft click edit icon, you can set the values to manage engines potentiels.If you have declared a counter in aircraft type, set the last counter for your plane. For the software to calculate the potential, set the flight time computation begin date. Only flights beyond this date will be recorded. |
| − | : | + | |
| − | : | + | <center>[[Image:Aircraft_TBO_en.jpg|Initialisation counter]]</center> |
| − | : | + | |
| − | : | + | == Admin/Fleet/Maintenance Menu == |
| + | :Click the Edit icon, you can set the potential management parameters' value. | ||
| + | :Next maintenance date: It is the date used as the reference for calendar alerts (e.g. CDN renewal). While waiting for the maintenance management module (which would be available with OpenFloyers 3.0), the mechanic manages the threshold himself by putting the limit according to his maintenance program. | ||
| + | :Next maintenance hour: This is the hour count for reference. The program deducts from this value the reference hours indicated in the Aircraft page and the flight time input by the pilots to calculate the remaining time. | ||
| + | :Levels of the alerts: There are 3 levels of hour and calendar alerts to set according to the desires of the mechanic. The visual alert in the reservation page will be the first due deadline. | ||
<center>[[Image:Maintenance_detail_en.jpg|Maintenance]]</center> | <center>[[Image:Maintenance_detail_en.jpg|Maintenance]]</center> | ||
| − | * | + | * The maintenance table recapitulates the information. |
<center>[[Image:Maintenance_table_en.jpg|Tableau de bord maintenance]]</center> | <center>[[Image:Maintenance_table_en.jpg|Tableau de bord maintenance]]</center> | ||
| − | == Menu | + | == Users Menu== |
| − | * | + | *Now, let us go to the Users Menu to create the different profiles you wish for your club, which manages the access right. |
| − | * | + | *I would recommend: Administrator, Pilots, Student, Instructor, Secretary, Accountant, Mechanic, and Visitor. |
<center>[[Image:Profile_booking_en.jpg|Profil Réservation]]</center> | <center>[[Image:Profile_booking_en.jpg|Profil Réservation]]</center> | ||
| − | == Menu | + | == Account Menu== |
| − | + | Let us now go to create different accounts. | |
| − | === | + | === Management / Export === |
| − | * | + | *Define a commencement date of the exercise account. |
| − | <center>[[Image:Account_Type_Users_en.jpg| | + | *Validate by clicking “Accounting period start date". |
| − | * | + | <center>[[Image:Account_Date_Account_en.jpg|Compte club]]</center> |
| − | <center>[[Image:Account_Users_en.jpg| | + | :The page will be re-posted with the fields to close the exercise. You have one year before worrying about it again. |
| − | + | ||
| + | === Budget === | ||
| + | If you decide to deal with budget, it's better to define budget names before creating accounts. | ||
| + | |||
| + | === Supplier Bill Management === | ||
| + | Once budgets are defined, it is possible to create the accounts useful for the supplier management module. | ||
| + | |||
| + | Then, you have to define the suppliers and for each of them to allocate a supplier account. | ||
| + | |||
| + | === Members === | ||
| + | * Create the account type in the Accounts / Members / Account Type. Every pilot can have several account types (for example, in the case of enterprise committees); To start to create a single account type: Main. | ||
| + | <center>[[Image:Account_Type_Users_en.jpg|Users accounts types]]</center> | ||
| + | * The user list will be posted in Accounts / Members. A click on the red icons will activate the the user account. | ||
| + | <center>[[Image:Account_Users_en.jpg|Users accounts]]</center> | ||
| + | Return to Admin / Users / Groups. Click on the icon Standard Modifier and input the required account type: Main. | ||
| − | + | Return to the Client / Parameter management page. | |
| − | * | + | *In the membership management section, sets the access ''restricted to visitor profile'' and indicates the expiration date of the membership fee. |
| − | <center>[[Image:Club_Param_Cotis2_en.jpg| | + | <center>[[Image:Club_Param_Cotis2_en.jpg|membership parameter]]</center> |
| − | * | + | *In the flight management section, sets the flight type “instruction” in the case that a second pilot is on board. |
| − | <center>[[Image:Club_Param_Vols2_en.jpg| | + | <center>[[Image:Club_Param_Vols2_en.jpg|membership parameter]]</center> |
| − | * | + | *In the accounts management section, sets the default account type to: Main. |
| − | * | + | *If the pilot account balance is less than the minimum amount: restricted access to the negative balance profile. |
| − | <center>[[Image:Club_Param_Compte2_en.jpg| | + | <center>[[Image:Club_Param_Compte2_en.jpg|membership parameter]]</center> |
| − | : | + | :Remember the due date to renew the membership for your designated administrator. |
| − | === | + | === Aircrafts === |
| − | * | + | * Create the account types in Accounts / Aircrafts / Account Type. This automatically creates an account allowing the distribution of the account entries for each aircraft. |
| − | : | + | : I suggest the following types: |
| − | ::- | + | ::- Flight hours: this will be the main account of each aircraft where the compensations of flight hours is debited in the Pilots accounts. |
| − | ::- | + | ::- Mechanic: this account will allow inputting in the account the associated cost with the aircrafts, from mechanical trial flight to convoying... |
| − | ::- | + | ::- Flying club: this account will allow entering in the account the flight/aircraft costs unable to be allocated to the pilots (like maiden flight, initiation flight, promotional flights...) |
<center>[[Image:Account_Type_Aircraft_en.jpg|Compte type avion]]</center> | <center>[[Image:Account_Type_Aircraft_en.jpg|Compte type avion]]</center> | ||
| − | * | + | * Click on the red icons in Accounts / Aircrafts to initialize the accounts |
<center>[[Image:Account_Aircraft_en.jpg|Compte avion]]</center> | <center>[[Image:Account_Aircraft_en.jpg|Compte avion]]</center> | ||
| − | === | + | === Client === |
| − | * | + | * Create the client management accounts in Accounts / Client Accounts. |
| − | + | For each account you can initialize the starting amount. It is necessary when we recover the values of an existing account in order to make the accounts synchronized with your accounting software. For the moment leave this field to be 0. It is also in this place where the necessary corresponding chart of accounts is indicated to export your transactions. The value is not mandatory as long as you do not want to export to an accounting software. | |
| − | + | ||
| − | + | Note: There exists an import module which allows performing these operations by batch (Club / Import). | |
| − | + | The box to be checked allows these accounts to receive the money from outside (in case of accounts Club and maiden flight). | |
| − | : | + | : I suggest the following accounts. |
| − | ::- Club : | + | ::- Club : this account allows registering the operations besides the flight hours (library, subsidy, etc.). For better management, it is preferred to create an account for each column than to use an account for all. |
| − | ::- | + | ::- Bank: to record the payments. |
| − | ::- | + | ::- Cash: Although this is also a payment, it is desirable to register the cash in a separate account. |
| − | ::- | + | ::- Maiden flight: to register the movements related to maiden flight, initiation flight, etc... |
| − | ::- | + | ::- Mechanic: to register the movements related to the mechanicals. |
| − | ::- | + | ::- Club membership: to register the accounts related to Club subscription, membership, etc... |
| − | ::- | + | ::- Landing taxes: to register the landing taxes claims not paid by the pilots. |
| − | ::- | + | ::- Gasoline refund: to register the gasoline refund claims paid by the pilots. |
<center>[[Image:Account_Club_en.jpg|Compte club]]</center> | <center>[[Image:Account_Club_en.jpg|Compte club]]</center> | ||
| − | === | + | === Payment List === |
| − | + | In Accounts / Payments / Payment types, you are going to indicate the payment mode used in the club. | |
| − | + | ||
| − | + | ||
| − | + | ||
| − | + | The name of the payment type should be input. You can disable the input from the pilots. Only the authorized personnel will be able to input the payment type. | |
| − | + | ||
| − | + | Edit box heading: if you leave this field empty, there will not be any complementary field; If not, please indicate the name you want, which appears before the input box. | |
| − | + | The supplier field is only related with the debit card payment installed in the OpenFlyers server. | |
| − | + | I suggest: Check, Cash, Debit Card (optional type), Bank transfer. | |
| − | + | ||
| − | + | ||
| − | + | ||
| − | + | ||
| − | + | ||
| − | + | ||
<center>[[Image:Account_Paiement_Type_en.jpg|types de paiement]]</center> | <center>[[Image:Account_Paiement_Type_en.jpg|types de paiement]]</center> | ||
| − | === | + | === Payment Type Distribution === |
| − | + | In Accounts / Payments / Bank Transfer, you are going to have the payment types matching against the corresponding accounts. | |
| − | + | :Check – Bank account, | |
| − | + | :Cash – Cash account, | |
| − | + | :Debit card – Bank account, | |
| − | + | :Bank transfer – Bank. | |
<center>[[Image:Account_Paiement_Dispatch_en.jpg|Ventilation des paiements]]</center> | <center>[[Image:Account_Paiement_Dispatch_en.jpg|Ventilation des paiements]]</center> | ||
| − | === | + | === Pricing Variables Setting === |
| − | + | In Accounts / Hourly charge rate/ Parameter management of the variables, you can create some variables which will then be used in the tariffing formulas. This enables updating the flight hourly charge rate without modifying all the pricing/charging formula. Only input some numbers or letter, for example: | |
| − | + | :$C1: Cessna Solo, | |
| − | + | :$D1: DR400 Solo, | |
| − | $C1 : Cessna Solo | + | :$L1: Lionceau Solo, |
| − | $D1 : DR400 Solo | + | :$CS1: Cirrus Solo, |
| − | $L1 : Lionceau Solo | + | :$CS2: Cirrus DC, |
| − | $CS1 : Cirrus Solo | + | :$DC: double command. |
| − | $CS2 : Cirrus DC | + | |
| − | $DC : double | + | |
| − | + | ||
<center>[[Image:Account_Variable_Type_en.jpg|Paramétrage des variables]]</center> | <center>[[Image:Account_Variable_Type_en.jpg|Paramétrage des variables]]</center> | ||
| − | === | + | === Values of Pricing Variables === |
| − | + | In Accounts / Hourly charge rate/ Variable setting, you are going to indicate the value of each variable. This variable has also a beginning date of application. This allows OpenFlyers to apply the adequate rate even in case of modification between two periods of the rate change. | |
| − | + | Indicate the value for each variable. | |
| − | + | To invoice the double command, you can manage by applying Solo + DC or the individual rates. | |
<center>[[Image:Account_Variable_Value_en.jpg|Valorisation des variables]]</center> | <center>[[Image:Account_Variable_Value_en.jpg|Valorisation des variables]]</center> | ||
| − | === | + | === Hourly Charge Rate === |
| − | + | In Accounts / Hourly Charge Rate, you are going to indicate to OpenFlyers how to calculate the flight time price. | |
| − | + | Add a pricing: | |
| − | ==== | + | ==== Example Solo flight ==== |
| − | * | + | * Give a name to the rate: Solo Cessna |
| − | * | + | * Put the pricing formula. In order to adapt to the multiple methods of flight hours calculation of the flight structure, OpenFlyers enables entering a pricing formula based on the elements input in database. Some examples about the pricing formula are described in this wiki. As a starting point, we indicate the price calculated on the flight time to be $C1*%DURATION/600. |
| − | ::- $C1 = Variable | + | |
| − | ::- %DURATION = | + | ::- $C1=Variable initialized before |
| − | ::- 600 = coefficient | + | ::- %DURATION=flight time |
| − | * | + | ::- 600=coefficient corresponding to a time rate |
| − | * | + | |
| − | * | + | * Left account: tick off “Member account” and then choose “Main” in member Account on the left (in this case the client Account on the left is inactive). |
| − | * | + | * Transaction direction: downward arrow |
| − | * | + | * Right account: tick off “aircraft Account” and then choose “flight Hours” in aircraft Account (in this case the client Account on the right is inactive). |
| − | * | + | * Affected pool: tick off Standard. |
| − | * | + | * Affected aircraft type: tick off the related type Cessna. |
| + | * Affected flight type: tick off local flight, cross-country flight | ||
| + | * Excluded flight type: tick off flight instruction. | ||
<center>[[Image:Flight_pricing_single_en.jpg|Tarif Solo]]</center> | <center>[[Image:Flight_pricing_single_en.jpg|Tarif Solo]]</center> | ||
| − | ==== | + | ==== Example Double Command Flight ==== |
| − | + | Same as Solo except for the followings | |
| − | * | + | * Put the pricing formula: ($C1+$DC)*%DURATION/600. |
| − | * | + | * Give a name to the rate: DC Cessna |
| − | * | + | * Affected flight type: tick off flight instruction. |
| − | * | + | * Excluded flight type: No |
<center>[[Image:Flight_pricing_recap1_en.jpg|Tarif Cessna]]</center> | <center>[[Image:Flight_pricing_recap1_en.jpg|Tarif Cessna]]</center> | ||
| − | ==== | + | ==== Example with DC pricing in two lines ==== |
| − | + | Example with traffing of DC in two lines | |
| − | * | + | * Flight type: tick off local flight, cross-country flight, flight instruction |
| − | * | + | * Excluded flight types: no |
<center>[[Image:Flight_pricing_recap2_en.jpg|Tarif Cirrus]]</center> | <center>[[Image:Flight_pricing_recap2_en.jpg|Tarif Cirrus]]</center> | ||
| − | ==== | + | ==== Example Maiden Flight ==== |
| − | * | + | * Give a name to the rate: maiden flight Cessna |
| − | * | + | * Put the pricing formula: $C1*%DURATION/600. |
| − | * | + | * Left account: tick off “club account” and then choose “Maiden flight” in club Account on the left (in this case the member Account on the left is inactive). |
| − | * | + | * Transaction direction: downward arrow |
| − | * | + | * Right account: tick off “aircraft Account” and then choose “Flying school” in aircraft Account (in this case the club Account on the right is inactive). |
| − | * | + | * Group: tick off “All”. |
| − | * | + | * Affected aircraft type: tick off the related type Cessna (remember to cancel “All”). |
| − | * | + | * Affected flight type: tick off maiden flight. |
| − | * | + | * Excluded flight types: no |
<center>[[Image:Flight_pricing_recap3_en.jpg|Tarif Baptême]]</center> | <center>[[Image:Flight_pricing_recap3_en.jpg|Tarif Baptême]]</center> | ||
| − | ==== | + | ==== Example Overhaul flight ==== |
| − | * | + | * Give a name to the rate: Overhaul Cessna |
| − | * | + | * Put the tariffing formula: #C1*%DURATION/600 |
| − | * | + | * Left account: tick off “club Account” and then choose “Mechanical” in club Account on the left (in this case the member Account on the left is inactive). |
| − | * | + | * Transaction direction: upward arrow |
| − | * | + | * Right account: tick off “aircraft Account” and then choose “Mechanical” in aircraft Account on the right (in this case the club Account on the right is inactive). |
| − | * | + | * Group: tick off “All” |
| − | * | + | * Affected aircraft type: tick off the related type Cessna (remember to cancel “All’). |
| − | * | + | * Affected flight type: tick off Maintenance check flight |
| − | * | + | * Excluded flight types: no |
<center>[[Image:Flight_pricing_recap4_en.jpg|Tarif mécanique]]</center> | <center>[[Image:Flight_pricing_recap4_en.jpg|Tarif mécanique]]</center> | ||
| − | * | + | * Do the same parameter setting for all the aircrafts. |
| − | == Menu | + | == User Menu == |
| − | * | + | * Return to the menu Users / Profiles to assign the authorizations to your different profiles. |
<center>[[Image:Profile_qualifs_en.jpg|Profils Qualification]]</center> | <center>[[Image:Profile_qualifs_en.jpg|Profils Qualification]]</center> | ||
<center>[[Image:Profile_admin_en.jpg|Profils Admin]]</center> | <center>[[Image:Profile_admin_en.jpg|Profils Admin]]</center> | ||
| Line 324: | Line 325: | ||
<center>[[Image:Profile_accounts_en.jpg|Profils Comptes]]</center> | <center>[[Image:Profile_accounts_en.jpg|Profils Comptes]]</center> | ||
| − | * | + | * From the Admin / Club / Imports / Import some users menu , you can import your users all at once from a file in csv. format. Follow the procedures described in the page. |
| + | |||
| + | * From the Admin / Users / Users menu, it is possible to individually add some users (new registrations). | ||
| + | |||
| + | * For the instructors, remember to tick off the square and a trigram which will be visible on the reservation notebook in the Admin / Users Menu. | ||
| + | |||
| + | * You should always define an availability period for each of the instructors, either a permanent availability in several days of one week, or some periodical available time slots. You can cumulate these time slots to have a maximum flexibility. | ||
| + | |||
| + | |||
| + | :Example : | ||
| + | ::- Permanently available from 8:00am to 19:00 pm Monday to Wednesday | ||
| + | ::- Permanently available from 8:00am to 19:00 pm Friday to Saturday | ||
| + | ::- Vacation leave from July 15 to July 30 | ||
| − | + | : Attention--do not create the incompatibility. In case that you encounter problem to present the availability, delete the instructor window and re-create the information. | |
| − | + | == Account Menu == | |
| − | * | + | * Return to Accounts / Members / Accounts to verify whether the Member accounts are correctly created and activated. If not, click on the red icon to initialize the member accounts. If a pilot account is not initialized in any case, there is a visible alert message when you open the administrator menu. |
| − | + | * The accounts are initialized at zero. To make the accounts accurate, all the operations must be written in dababase from the initialization. | |
| − | + | ||
| − | + | ||
| − | + | ||
| − | + | ||
| − | + | : To initialize the pilot payment provided from accountancy, import a csv file of “Balance” from the Admin / Club / Imports / Accounts Initialization menu and follow the instruction written on the page. | |
| − | |||
| − | |||
| − | |||
| − | + | VOILA, You have finished the configuration of OpenFlyers 2.1. BRAVO! You still have to do some trials to make sure everything works fine. You have made some effort, but now you almost know every function of your new tool and will know better, e.g.where to enter a modification, as time goes by. Well done with OpenFlyers 2.1!!! | |
| − | + | END OF CONFIGURATION | |
Latest revision as of 14:51, 17 December 2009
Contents
- 1 OpenFlyers 2.1 Configuration
- 2 Introduction
- 3 Parameter Menu
- 4 Club/Configuration Menu
- 5 Admin/Users Menu
- 6 Admin/Fleet Menu
- 7 Admin/Feet/Aircraft types Menu
- 8 Admin/Fleet/Aircraft Menu
- 9 Admin/Fleet/Maintenance Menu
- 10 Users Menu
- 11 Account Menu
- 12 User Menu
- 13 Account Menu
OpenFlyers 2.1 Configuration
The 2.1 release introduces flight management, pilot account management, as well as all accountancy management features. Making these functions to a working state requires some parameter settings.
Configuration operation sequencing is of most importance! Neglecting that may create some bugs and problems.
Introduction
First Initialisation
- Log in with the ID/password admin/admin or with an admin profile if you have already done an ID admin modification.
- Go to Admin/Users/"Users list" to create your own member file.
- Choose your date display format
- Choose the timezone and your language
- Fill in your file
- Do not forget to check the "club admin" profile, the only available profile at this stage
- Log out, and then log in with your newly created ID.
- Go back to Admin/Users/"Users list" and delete the admin member file.
Parameter Menu
Access the page through Admin/Configuration/Parameter Setting. This is where the various functions will be activated/inactivated.
Do not forget to push the "Submit" button on every section before setting a new section.
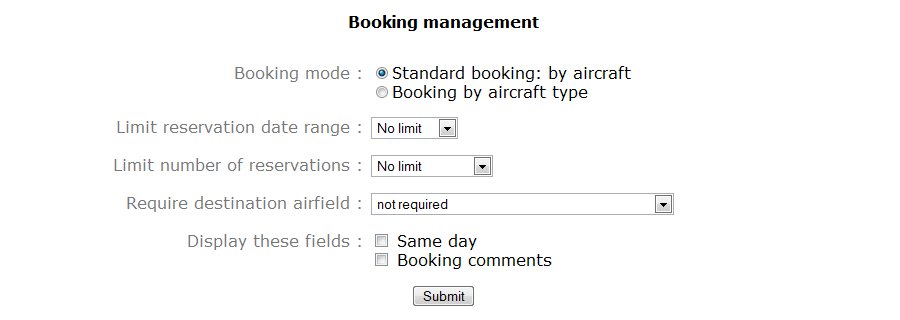
Reservation Management
- Checking "Standard booking: by aircraft": each aircraft is identified by his own registration.
- Booking by aircraft type allows to manage reservation by aircraft pool according to their type (Cessna 152, Robin DR42,...): thus reservation is not made with the registration chosen by the user but with the first available aircraft (according to a sequence/queue defined by the admin) of the same type as the one selected by the user
- Limitation in the time of the reservations: there is the limitation in the number of weeks of advance reservation
- Number of reservations limitation: to limit the number of the reservation each pilot can make
- Fill in destination airfield: mandatory to fill in the destion field according to the duration
- You may choose to display the following booking field or not: "Same day" and "Booking comments"
Licence Management
- Disble it for the moment, as you will be able to activate it later!

Membership Management
- Select "Access Alert", this option will warn the users when log in if the membership is not updated. By the end of the parameter setting you can change to "Restrictited access" with definitive profile
- Set the membership expiration date.

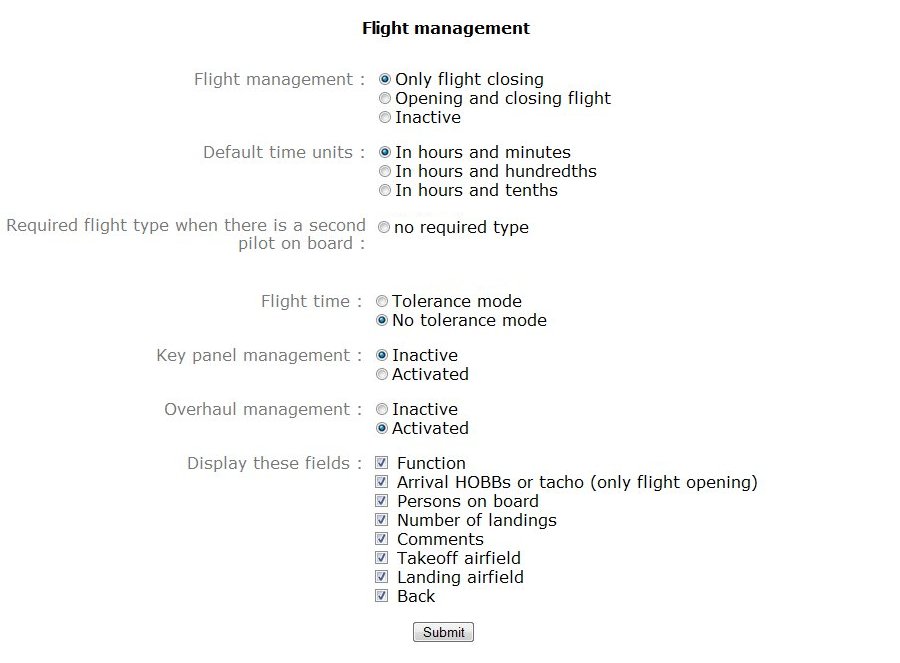
Flight Management
- Activate "Closing flight only"
- Select time units (the most common hour, minute). .
- No required flight
- No tolerance mode (mistakes should be corrected by the pilot); Tolerance mode means that the software tries to correct the error(s) automaticly
- Key panel inactive
- Overhaul management activated
- Enable all checkbox, later you can disable some of them
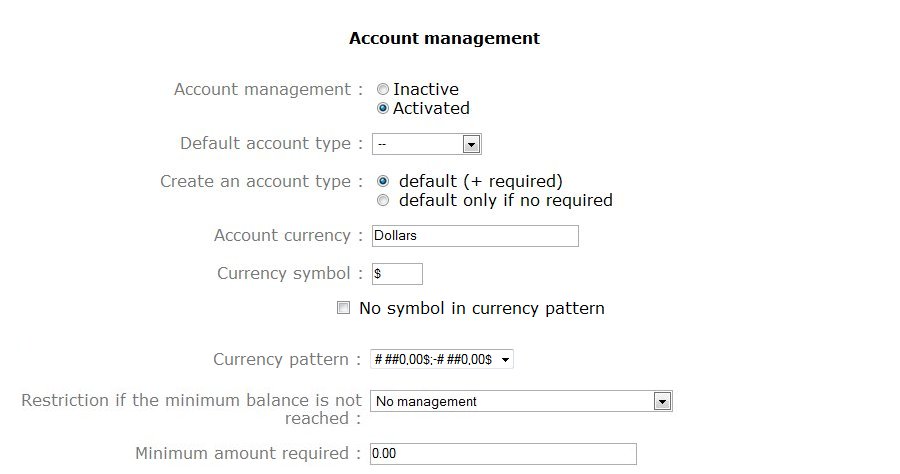
Account Management
- Active account management
- No account type is created at this stage, so no default account can be selected
- Indicate your account currency and the currency symbol
- Display format is a pattern that allows you to manage your display (decimal separator, position symbol, ...) : $ for US Dollars, and € for Euro
- No Management if the balance is below a minimum amount. You can set the minimum amount when creating the profile
Club/Configuration Menu
- Set the default langauge of the club; each pilot can configure his own display language
- Fill in others club fields
- Load your logo, the size around 300 x 200 pixels
- Select your airfield; if your airfriend is not available in the database, select Other and put coordinate format NDDMMSS and WDDDMMSS
- There is 2 messages box: the first on top of booking page, and the second on login page.
- Mail list, select generic; this function will be set later
- Set start and finish display time on booking page. Be carefull, it is UTC time, you should take into account your DST (Daylight Saving Time)if applicable
- example : France, Timezone UTC +1 h, DST summer + 1 h - Display booking : Start from 7 o'clock, End at 22 o'clock : set 5 h and 20 h in summer time or 6 h and 21 h in winter time - example : Nouméa, New Caledonia, timezone UTC +11 h, no DST - Display booking : Start from 7 o'clock, End at 22 o'clock : set 20 h (start ) and 11 h (end) - example : Papeete, Tahiti, timezone UTC -10 h, no DST - Display booking : Start 7 o'clock, End 22 o'clock : set 17 h (start ) and 8 h (end)
- Set minimal booking time and flight default time
- Administrator name is shown on login page with an email link
- Check default options for your new users
- Set the default format date
- Set timezone. Do not think of DST because it will be calculated automatically by the server
Admin/Users Menu
- In Users/Users go to the page where your log-in appears and tick off the membership checkbox, then click on "update"
This should update the expiry date of membership set before
- Go to Users/Status to create the status you wish for your club. I recommend: Student, Captain, Instructor as the minimum.

Admin/Fleet Menu
Alert message will appear because of incomplet configuration. Ignore the messages; they will disappear as your follow the tutorial
- Flights/Flight types add flight type necessary for your club.
- I suggest: local flight, cross-country, flight instruction, maiden flight, maintenance check flight

- Set Incompatible flight types
- Cross-country flight/Local flight
- Maiden flight/Local fight + Cross-country flight + Flight instruction
- Maintenance check flight/Local flight + Cross-country flight + Flight instruction + Maiden flight
To allow calculation of statistics, do not allow pilots to check multiple boxes when inputting flights; calculation of statistics will not be possible at the end of the year. We must create as many types of flight as necessary and put the maximum incompatibility. Only the type of flight in the case of a second pilot on board can be compatible with other types

- Do not fill in the Required qualifications table
Click on "Parameters" to define the required flight type in the case of a second pilot on board. This displays on page Club parameters, in Flight management check "Flight instruction" in "Required flight type when there is a second pilot on board". This action checks automatically "Flight instruction" when flying instructor will be selected as the second pilot.
Admin/Feet/Aircraft types Menu
Now it is time to create the your fleet aircraft type:
- In Fleet/Aircraft Types/ add your aircraft types

- After validation, click on Edit (pencil icon)
- Choose the time unit for the time meter of your aircraft
- Tolerance is tolerated meter gap between 2 flights. This will avoid alerts for forgotten flights. You can leave at 0
- Indicate the endurance for the aircraft
- Choose your method fo computation management flight time. " Difference between start and stop" - You can change it later if it is not applicable in your case. For more information about possible formula please refer to Formula for calculating Flight Times
- Validate
- Indicate your aircraft tanks: the name of the tank, fuel type, and unit. Click add between each tank.
- Return to the previous page
- Do not create incompatibility
- Do not create required flight types
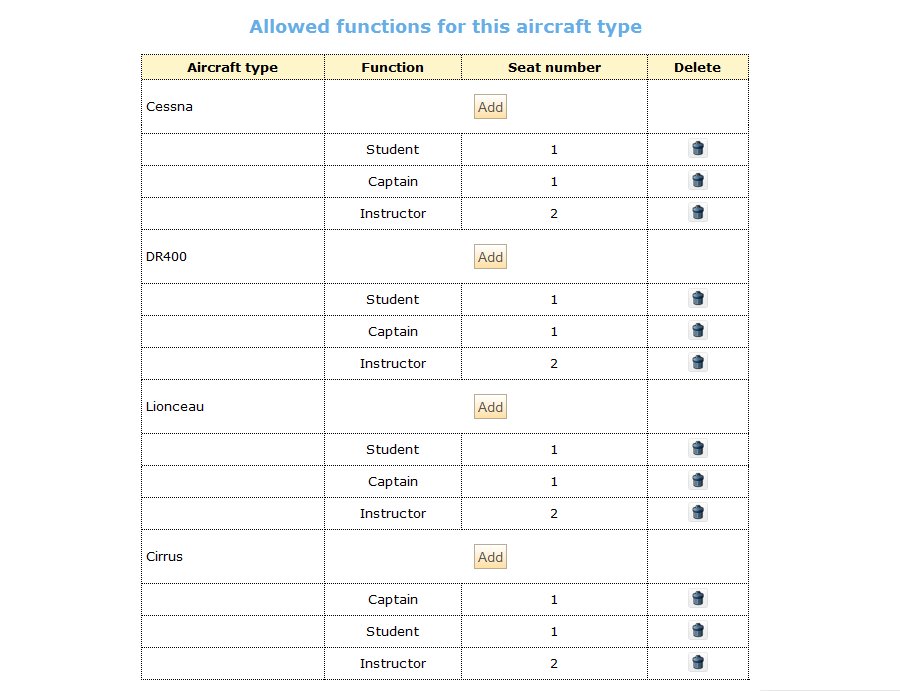
- In Allowed functions for this aircraft type, you must define the position in the aircraft : put "Captain" and "Student" as #1 and "Instructor" as #2
Admin/Fleet/Aircraft Menu
Once the type of the aircraft is created, you are going to create your aircraft fleet:
- Go to Fleet/Aircraft and add an aircraft

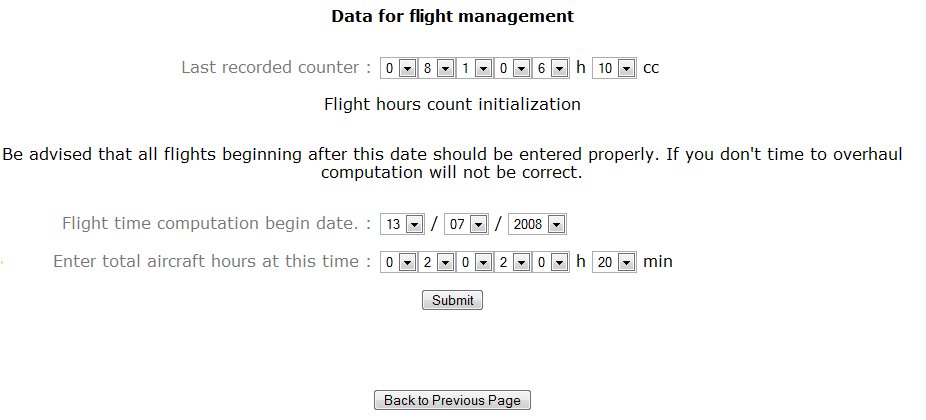
- For each aircraft click edit icon, you can set the values to manage engines potentiels.If you have declared a counter in aircraft type, set the last counter for your plane. For the software to calculate the potential, set the flight time computation begin date. Only flights beyond this date will be recorded.
Admin/Fleet/Maintenance Menu
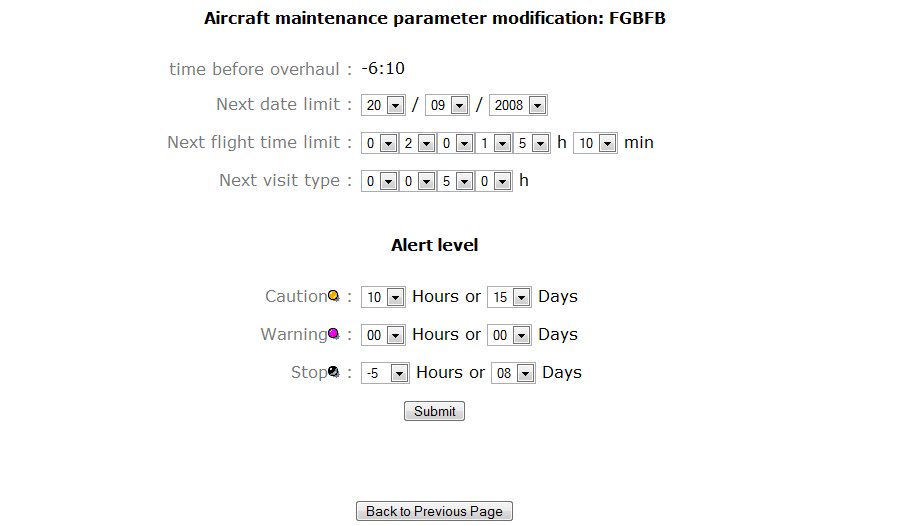
- Click the Edit icon, you can set the potential management parameters' value.
- Next maintenance date: It is the date used as the reference for calendar alerts (e.g. CDN renewal). While waiting for the maintenance management module (which would be available with OpenFloyers 3.0), the mechanic manages the threshold himself by putting the limit according to his maintenance program.
- Next maintenance hour: This is the hour count for reference. The program deducts from this value the reference hours indicated in the Aircraft page and the flight time input by the pilots to calculate the remaining time.
- Levels of the alerts: There are 3 levels of hour and calendar alerts to set according to the desires of the mechanic. The visual alert in the reservation page will be the first due deadline.
- The maintenance table recapitulates the information.

Users Menu
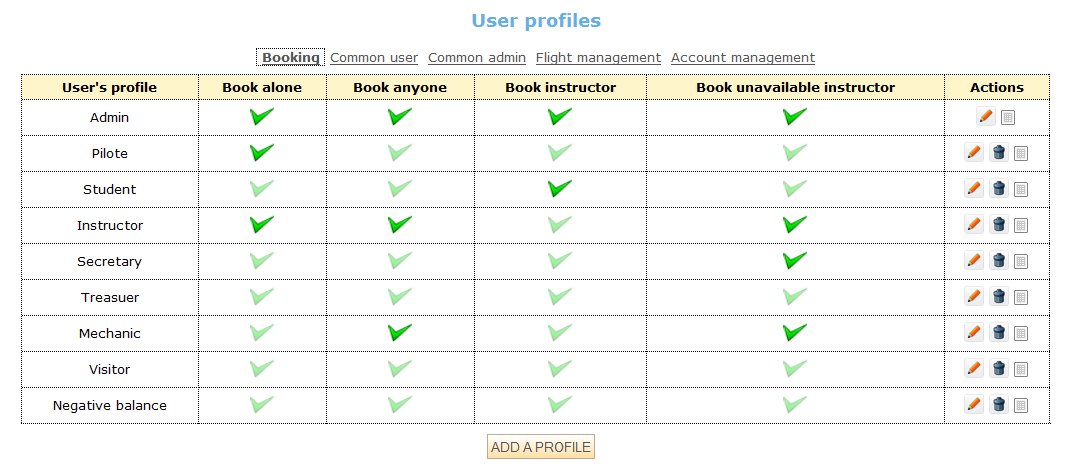
- Now, let us go to the Users Menu to create the different profiles you wish for your club, which manages the access right.
- I would recommend: Administrator, Pilots, Student, Instructor, Secretary, Accountant, Mechanic, and Visitor.
Account Menu
Let us now go to create different accounts.
Management / Export
- Define a commencement date of the exercise account.
- Validate by clicking “Accounting period start date".

- The page will be re-posted with the fields to close the exercise. You have one year before worrying about it again.
Budget
If you decide to deal with budget, it's better to define budget names before creating accounts.
Supplier Bill Management
Once budgets are defined, it is possible to create the accounts useful for the supplier management module.
Then, you have to define the suppliers and for each of them to allocate a supplier account.
Members
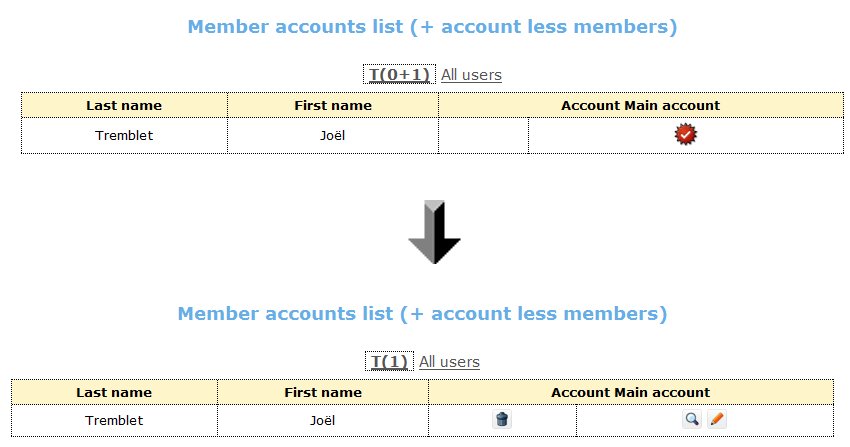
- Create the account type in the Accounts / Members / Account Type. Every pilot can have several account types (for example, in the case of enterprise committees); To start to create a single account type: Main.

- The user list will be posted in Accounts / Members. A click on the red icons will activate the the user account.
Return to Admin / Users / Groups. Click on the icon Standard Modifier and input the required account type: Main.
Return to the Client / Parameter management page.
- In the membership management section, sets the access restricted to visitor profile and indicates the expiration date of the membership fee.

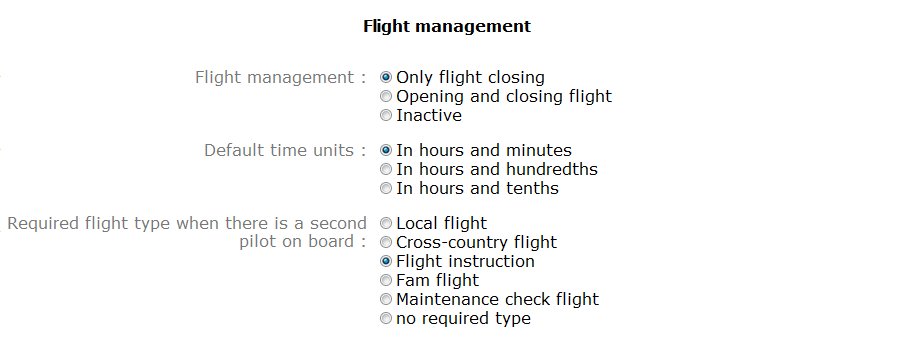
- In the flight management section, sets the flight type “instruction” in the case that a second pilot is on board.
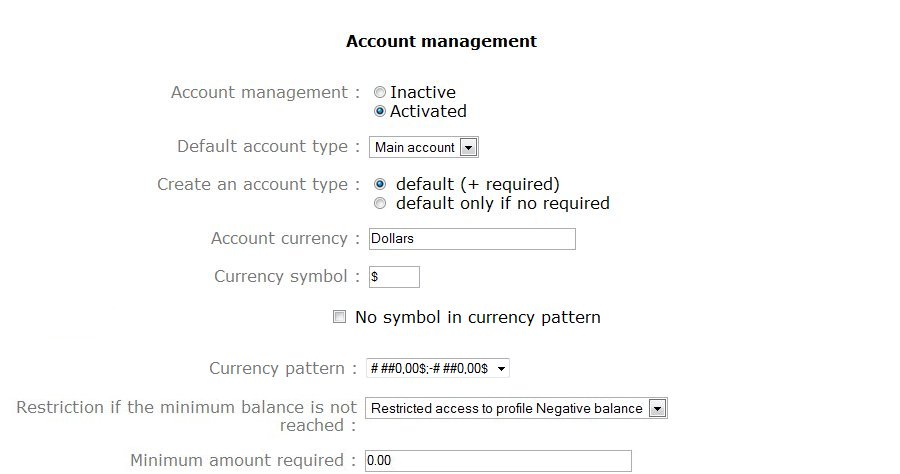
- In the accounts management section, sets the default account type to: Main.
- If the pilot account balance is less than the minimum amount: restricted access to the negative balance profile.
- Remember the due date to renew the membership for your designated administrator.
Aircrafts
- Create the account types in Accounts / Aircrafts / Account Type. This automatically creates an account allowing the distribution of the account entries for each aircraft.
- I suggest the following types:
- - Flight hours: this will be the main account of each aircraft where the compensations of flight hours is debited in the Pilots accounts.
- - Mechanic: this account will allow inputting in the account the associated cost with the aircrafts, from mechanical trial flight to convoying...
- - Flying club: this account will allow entering in the account the flight/aircraft costs unable to be allocated to the pilots (like maiden flight, initiation flight, promotional flights...)

- Click on the red icons in Accounts / Aircrafts to initialize the accounts

Client
- Create the client management accounts in Accounts / Client Accounts.
For each account you can initialize the starting amount. It is necessary when we recover the values of an existing account in order to make the accounts synchronized with your accounting software. For the moment leave this field to be 0. It is also in this place where the necessary corresponding chart of accounts is indicated to export your transactions. The value is not mandatory as long as you do not want to export to an accounting software.
Note: There exists an import module which allows performing these operations by batch (Club / Import).
The box to be checked allows these accounts to receive the money from outside (in case of accounts Club and maiden flight).
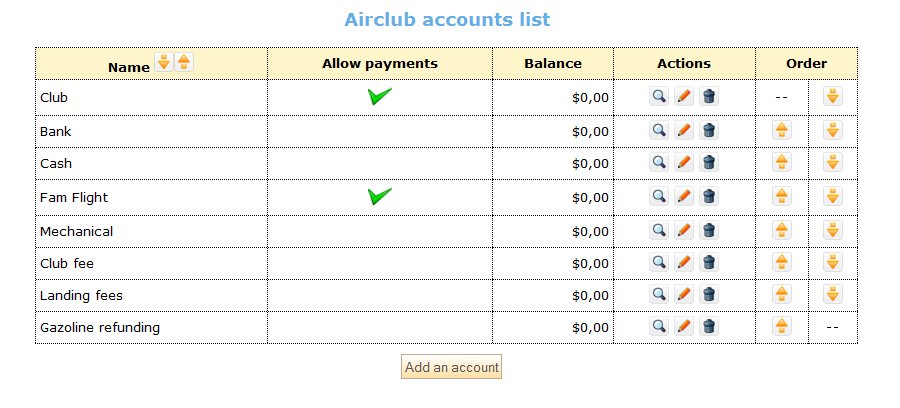
- I suggest the following accounts.
- - Club : this account allows registering the operations besides the flight hours (library, subsidy, etc.). For better management, it is preferred to create an account for each column than to use an account for all.
- - Bank: to record the payments.
- - Cash: Although this is also a payment, it is desirable to register the cash in a separate account.
- - Maiden flight: to register the movements related to maiden flight, initiation flight, etc...
- - Mechanic: to register the movements related to the mechanicals.
- - Club membership: to register the accounts related to Club subscription, membership, etc...
- - Landing taxes: to register the landing taxes claims not paid by the pilots.
- - Gasoline refund: to register the gasoline refund claims paid by the pilots.
Payment List
In Accounts / Payments / Payment types, you are going to indicate the payment mode used in the club.
The name of the payment type should be input. You can disable the input from the pilots. Only the authorized personnel will be able to input the payment type.
Edit box heading: if you leave this field empty, there will not be any complementary field; If not, please indicate the name you want, which appears before the input box.
The supplier field is only related with the debit card payment installed in the OpenFlyers server.
I suggest: Check, Cash, Debit Card (optional type), Bank transfer.

Payment Type Distribution
In Accounts / Payments / Bank Transfer, you are going to have the payment types matching against the corresponding accounts.
- Check – Bank account,
- Cash – Cash account,
- Debit card – Bank account,
- Bank transfer – Bank.

Pricing Variables Setting
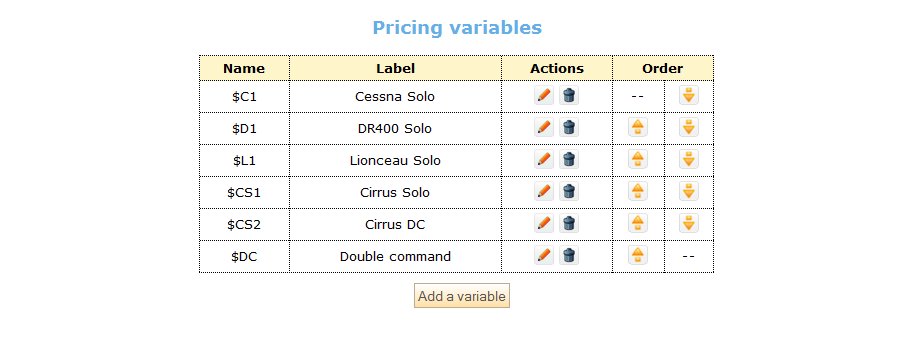
In Accounts / Hourly charge rate/ Parameter management of the variables, you can create some variables which will then be used in the tariffing formulas. This enables updating the flight hourly charge rate without modifying all the pricing/charging formula. Only input some numbers or letter, for example:
- $C1: Cessna Solo,
- $D1: DR400 Solo,
- $L1: Lionceau Solo,
- $CS1: Cirrus Solo,
- $CS2: Cirrus DC,
- $DC: double command.
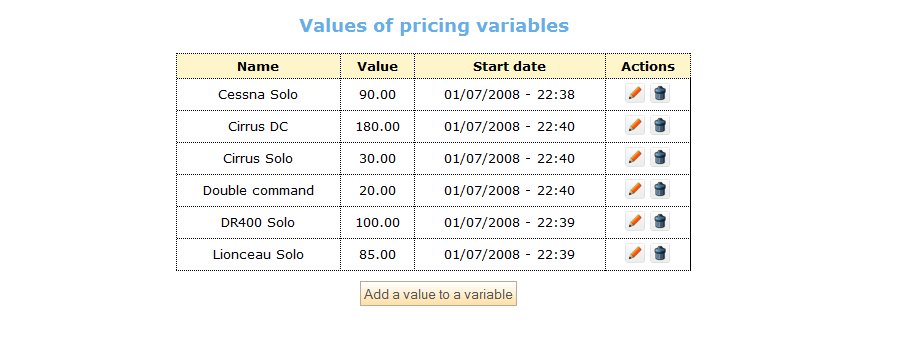
Values of Pricing Variables
In Accounts / Hourly charge rate/ Variable setting, you are going to indicate the value of each variable. This variable has also a beginning date of application. This allows OpenFlyers to apply the adequate rate even in case of modification between two periods of the rate change.
Indicate the value for each variable.
To invoice the double command, you can manage by applying Solo + DC or the individual rates.
Hourly Charge Rate
In Accounts / Hourly Charge Rate, you are going to indicate to OpenFlyers how to calculate the flight time price.
Add a pricing:
Example Solo flight
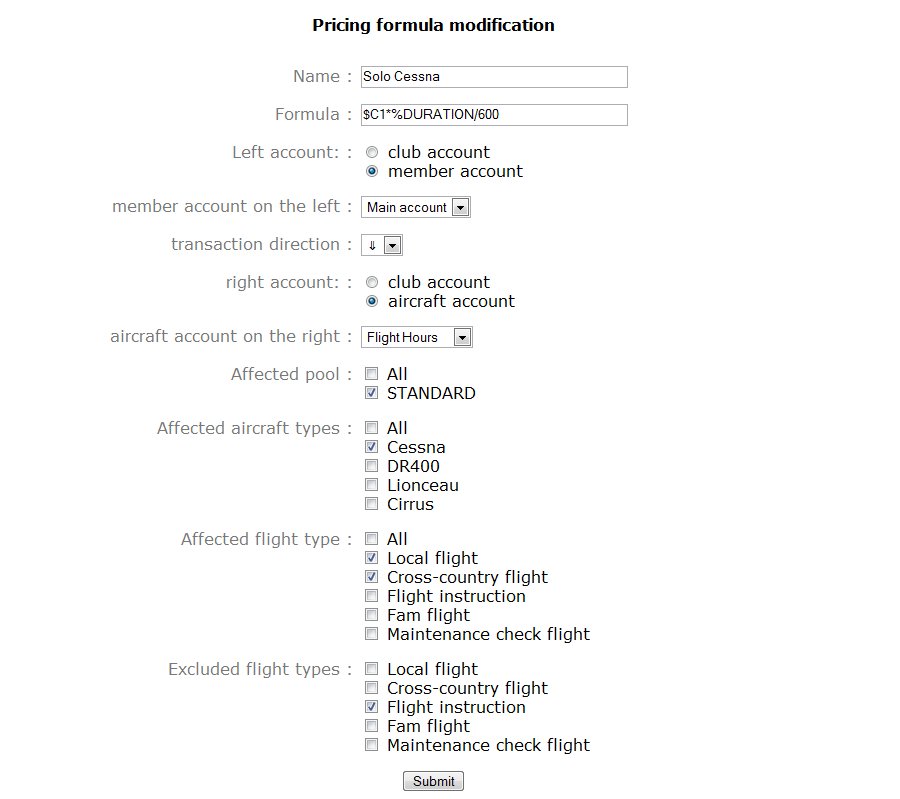
- Give a name to the rate: Solo Cessna
- Put the pricing formula. In order to adapt to the multiple methods of flight hours calculation of the flight structure, OpenFlyers enables entering a pricing formula based on the elements input in database. Some examples about the pricing formula are described in this wiki. As a starting point, we indicate the price calculated on the flight time to be $C1*%DURATION/600.
- - $C1=Variable initialized before
- - %DURATION=flight time
- - 600=coefficient corresponding to a time rate
- Left account: tick off “Member account” and then choose “Main” in member Account on the left (in this case the client Account on the left is inactive).
- Transaction direction: downward arrow
- Right account: tick off “aircraft Account” and then choose “flight Hours” in aircraft Account (in this case the client Account on the right is inactive).
- Affected pool: tick off Standard.
- Affected aircraft type: tick off the related type Cessna.
- Affected flight type: tick off local flight, cross-country flight
- Excluded flight type: tick off flight instruction.
Example Double Command Flight
Same as Solo except for the followings
- Put the pricing formula: ($C1+$DC)*%DURATION/600.
- Give a name to the rate: DC Cessna
- Affected flight type: tick off flight instruction.
- Excluded flight type: No

Example with DC pricing in two lines
Example with traffing of DC in two lines
- Flight type: tick off local flight, cross-country flight, flight instruction
- Excluded flight types: no

Example Maiden Flight
- Give a name to the rate: maiden flight Cessna
- Put the pricing formula: $C1*%DURATION/600.
- Left account: tick off “club account” and then choose “Maiden flight” in club Account on the left (in this case the member Account on the left is inactive).
- Transaction direction: downward arrow
- Right account: tick off “aircraft Account” and then choose “Flying school” in aircraft Account (in this case the club Account on the right is inactive).
- Group: tick off “All”.
- Affected aircraft type: tick off the related type Cessna (remember to cancel “All”).
- Affected flight type: tick off maiden flight.
- Excluded flight types: no

Example Overhaul flight
- Give a name to the rate: Overhaul Cessna
- Put the tariffing formula: #C1*%DURATION/600
- Left account: tick off “club Account” and then choose “Mechanical” in club Account on the left (in this case the member Account on the left is inactive).
- Transaction direction: upward arrow
- Right account: tick off “aircraft Account” and then choose “Mechanical” in aircraft Account on the right (in this case the club Account on the right is inactive).
- Group: tick off “All”
- Affected aircraft type: tick off the related type Cessna (remember to cancel “All’).
- Affected flight type: tick off Maintenance check flight
- Excluded flight types: no

- Do the same parameter setting for all the aircrafts.
User Menu
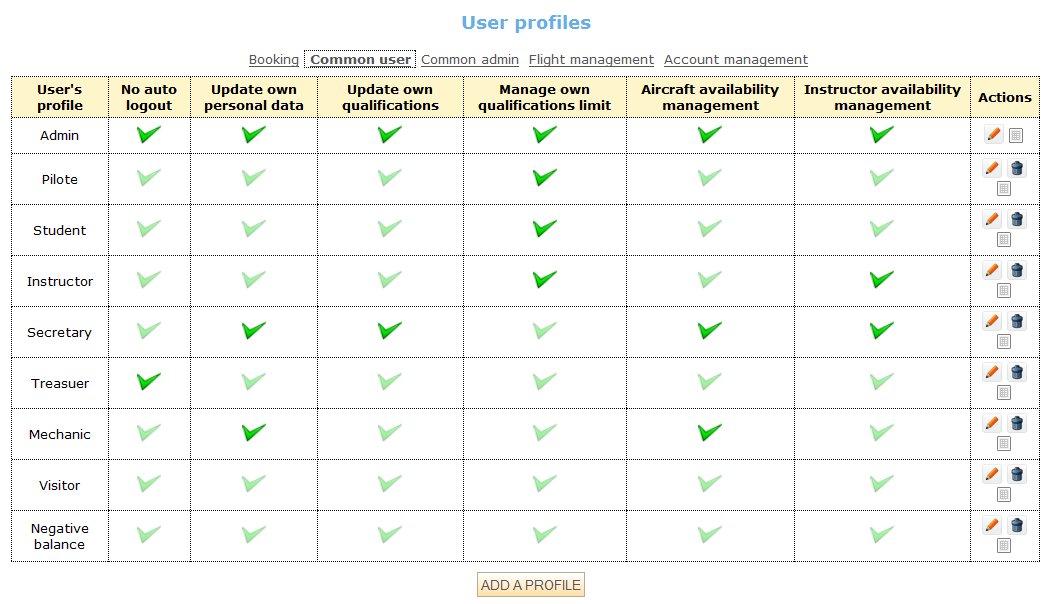
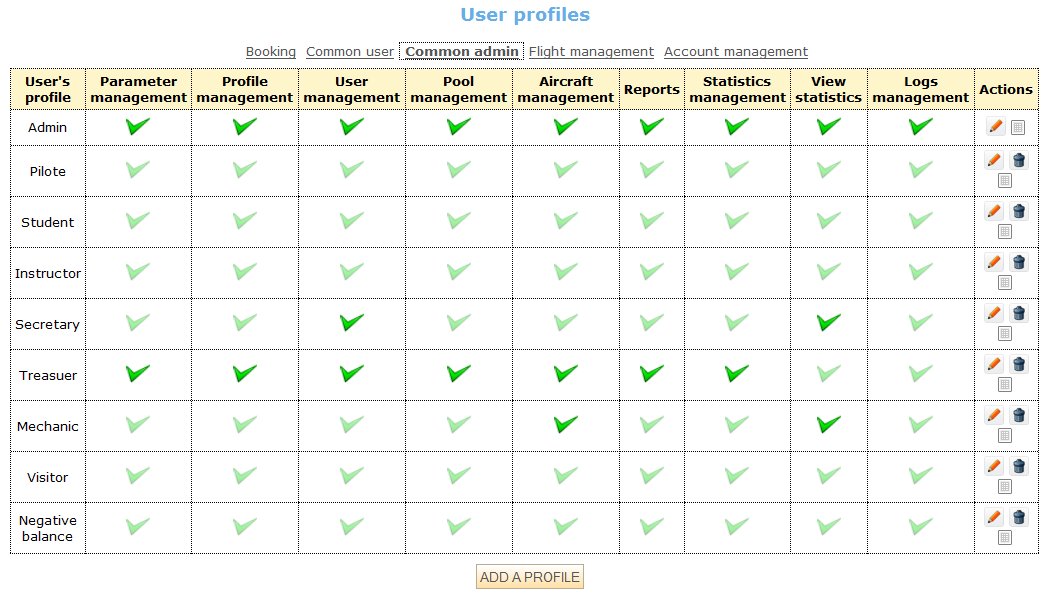
- Return to the menu Users / Profiles to assign the authorizations to your different profiles.
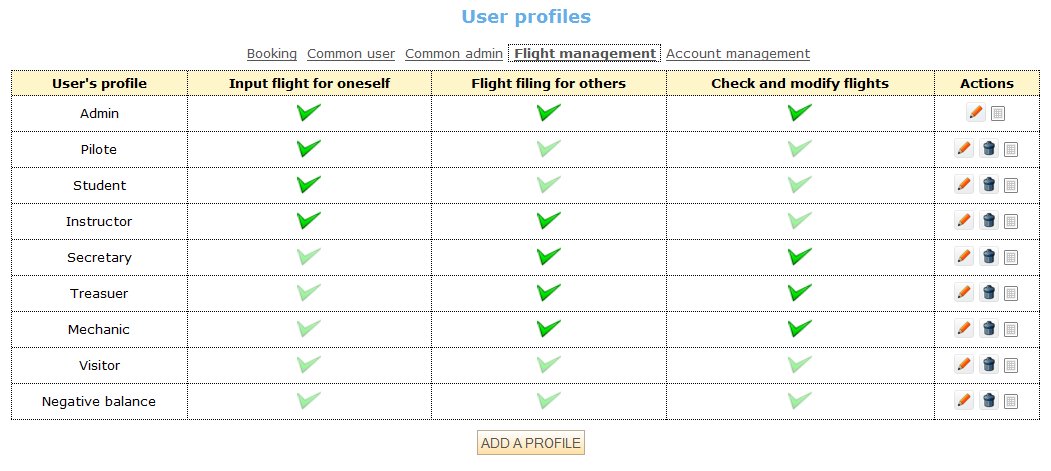
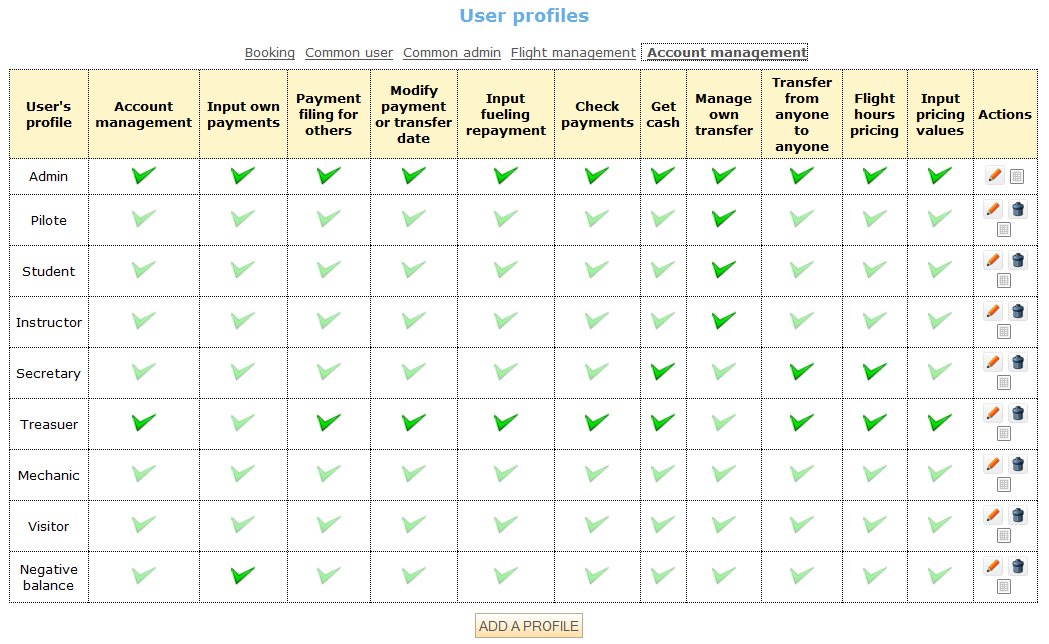
- From the Admin / Club / Imports / Import some users menu , you can import your users all at once from a file in csv. format. Follow the procedures described in the page.
- From the Admin / Users / Users menu, it is possible to individually add some users (new registrations).
- For the instructors, remember to tick off the square and a trigram which will be visible on the reservation notebook in the Admin / Users Menu.
- You should always define an availability period for each of the instructors, either a permanent availability in several days of one week, or some periodical available time slots. You can cumulate these time slots to have a maximum flexibility.
- Example :
- - Permanently available from 8:00am to 19:00 pm Monday to Wednesday
- - Permanently available from 8:00am to 19:00 pm Friday to Saturday
- - Vacation leave from July 15 to July 30
- Attention--do not create the incompatibility. In case that you encounter problem to present the availability, delete the instructor window and re-create the information.
Account Menu
- Return to Accounts / Members / Accounts to verify whether the Member accounts are correctly created and activated. If not, click on the red icon to initialize the member accounts. If a pilot account is not initialized in any case, there is a visible alert message when you open the administrator menu.
- The accounts are initialized at zero. To make the accounts accurate, all the operations must be written in dababase from the initialization.
- To initialize the pilot payment provided from accountancy, import a csv file of “Balance” from the Admin / Club / Imports / Accounts Initialization menu and follow the instruction written on the page.
VOILA, You have finished the configuration of OpenFlyers 2.1. BRAVO! You still have to do some trials to make sure everything works fine. You have made some effort, but now you almost know every function of your new tool and will know better, e.g.where to enter a modification, as time goes by. Well done with OpenFlyers 2.1!!!
END OF CONFIGURATION