Difference between revisions of "Accounting3"
m (moved Accounting3.0 to Accounting3) |
|||
| (5 intermediate revisions by one other user not shown) | |||
| Line 1: | Line 1: | ||
=Supplier's invoice entry= | =Supplier's invoice entry= | ||
| − | We recommend to use a secured connexion to access your customer account https://openflyers.openflyers.fr/index.php | + | We recommend to use a secured connexion to access to your customer account https://openflyers.openflyers.fr/index.php |
*Go to Admin. | *Go to Admin. | ||
| − | [[Image: | + | [[Image:admin_customer_space.png]] |
| − | * | + | *Purchases/Input supplier bill. |
| − | * | + | *Select Input supplier bill. |
| − | [[Image: | + | [[Image:input_supplier_bill.png]] |
| − | + | Once selected, the number of fields to be completed get reduced. | |
| − | [[Image: | + | [[Image:complete_input_supplier_bill.png]] |
| − | * | + | *Report on your bill the unique check number that has been attributed. |
| − | * | + | *Check "I've well taken in account this value and I've reported it on my bill", otherwise, if you validate, the system will refuse your data and an alert is displayed. |
| − | * | + | *You can add some useful informations concerning the invoice in the field Description. |
| − | * | + | *Report the billing date by clicking on the calendar. You can modify how to display the date by going into Data/Display and personal data/Time format pattern. |
| − | * | + | *Report the amount without tax, then the VAT. If VAT is equal to 0, then put 0. |
| − | * | + | *Click on Validate or on Validate and Input next one if you have several invoices to enter. In that case, you will be directed on the page to select Input supplier bill for the new invoice to be entered. |
| + | |||
| + | =Assigning a new account= | ||
| + | When you want to assign a new suplier account, yu must fill the field as follow: | ||
| + | [[Image:input_empty_supplier_bill.png]] | ||
| + | |||
| + | Supplier bill type : Assigned a new account | ||
| + | |||
| + | Bill type name : | ||
| + | |||
| + | Supplier : Other... | ||
| + | |||
| + | Budget to attribute : No budget | ||
| + | |||
| + | Supplier name : | ||
| + | |||
| + | Supplier account : Other... | ||
| + | |||
| + | Supplier export account : | ||
| + | |||
| + | Budget to attribute : No budget | ||
| + | |||
| + | Expense account : Other... | ||
| + | |||
| + | Budget to attribute : No budget | ||
| + | |||
| + | Account name : | ||
| + | |||
| + | Export account : | ||
| + | |||
| + | Bill type VAT account : Other... | ||
| + | |||
| + | Budget to attribute : No budget | ||
| + | |||
| + | VAT account name : | ||
| + | |||
| + | VAT export account : | ||
| + | |||
| + | Check number : xxx I've well taken in account this value and I've reported it on my bill | ||
| + | |||
| + | Description : | ||
| + | |||
| + | Billing date : xx-xx-xxxx | ||
| + | |||
| + | Amount without tax : | ||
| + | |||
| + | Amount excluding tax is not a number | ||
| + | |||
| + | VAT : | ||
| + | |||
| + | Total : 0 | ||
| + | |||
| + | Validate | ||
| + | |||
| + | Validate and input next one | ||
Latest revision as of 16:06, 4 June 2013
Supplier's invoice entry
We recommend to use a secured connexion to access to your customer account https://openflyers.openflyers.fr/index.php
- Go to Admin.
- Purchases/Input supplier bill.
- Select Input supplier bill.
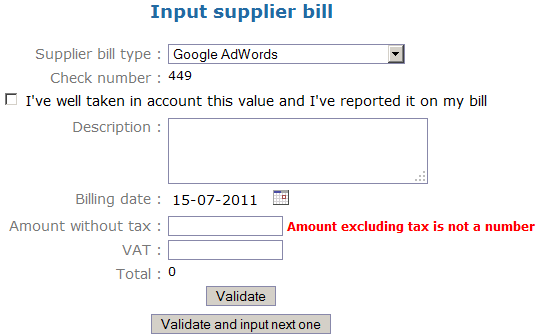
Once selected, the number of fields to be completed get reduced.
- Report on your bill the unique check number that has been attributed.
- Check "I've well taken in account this value and I've reported it on my bill", otherwise, if you validate, the system will refuse your data and an alert is displayed.
- You can add some useful informations concerning the invoice in the field Description.
- Report the billing date by clicking on the calendar. You can modify how to display the date by going into Data/Display and personal data/Time format pattern.
- Report the amount without tax, then the VAT. If VAT is equal to 0, then put 0.
- Click on Validate or on Validate and Input next one if you have several invoices to enter. In that case, you will be directed on the page to select Input supplier bill for the new invoice to be entered.
Assigning a new account
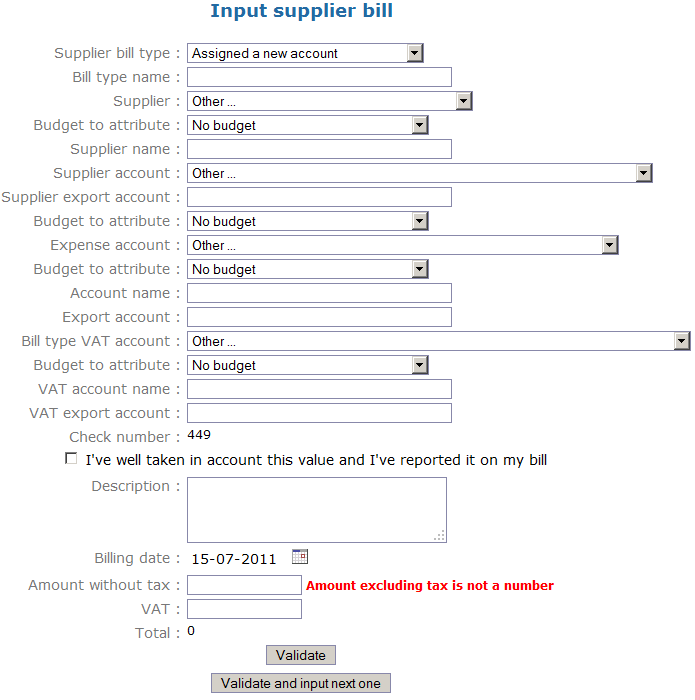
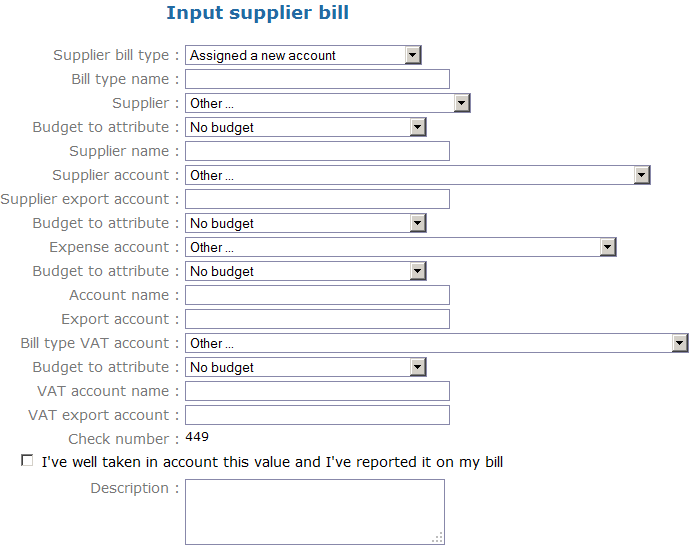
When you want to assign a new suplier account, yu must fill the field as follow:

Supplier bill type : Assigned a new account
Bill type name :
Supplier : Other...
Budget to attribute : No budget
Supplier name :
Supplier account : Other...
Supplier export account :
Budget to attribute : No budget
Expense account : Other...
Budget to attribute : No budget
Account name :
Export account :
Bill type VAT account : Other...
Budget to attribute : No budget
VAT account name :
VAT export account :
Check number : xxx I've well taken in account this value and I've reported it on my bill
Description :
Billing date : xx-xx-xxxx
Amount without tax :
Amount excluding tax is not a number
VAT :
Total : 0
Validate
Validate and input next one

